Configure ConnectWise PSA Security Roles and API Members
How to set up ConnectWise for TopLeft
TopLeft needs access to your ConnectWise Manage application to download tickets, projects, members, and other records used to display your data. It also updates ConnectWise records when changes are made in TopLeft.
All communication between TopLeft and your ConnectWise instance uses the ConnectWise REST API and is encrypted by TLS.
To allow TopLeft access to your ConnectWise database, follow these instructions. These steps must be performed by a ConnectWise administrator with permission to manage security roles and members.
ConnectWise Requirements
- ConnectWise Manage cloud or on-premise- TopLeft works with either
- For on-premise ConnectWise only: ConnectWise version from last 12 months or so.
Setup Checklist
These are the steps to configure your ConnectWise Manage application for TopLeft:
- Add a security role for TopLeft
- Add an API member
- Set up API credentials for the member
- For on-premise ConnectWise only: if ConnectWise is behind a firewall filtering access by IP or region, add our IP addresses to your whitelist.
- Submit the API credentials and other information in the customer portal
Add a Security Role for TopLeft
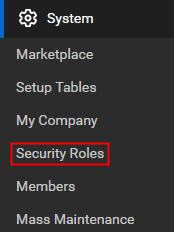
To limit the information available to TopLeft, we recommend you set up a Security Role dedicated to the TopLeft user. To open the Security Roles administration section, click System > Security Roles.

Click the "+" button in the toolbar.
Enter "TopLeft" as the role name, or follow an existing pattern for role names. Click the save icon ![]() .
.
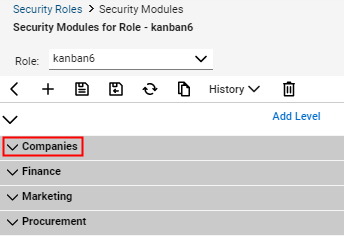
In the role list, click the new role name to list security modules for the role.
Update the module function security to match these definitions. For modules and functions not mentioned, leave them at their default settings.
Module: Companies
To open the Companies security module, click Companies in the list.

The module function administration table is displayed. Change the permissions rows to match the following levels.
| Module | Description | Add Level | Edit Level | Delete Level | Inquire Level | Comments |
|---|---|---|---|---|---|---|
| Companies | Company Maintenance | None | None | None | All | Allows TopLeft to fetch and display client company information |
| Companies | Configurations | None | None | None | All | Required to list configurations |
| Companies | Contacts | None | None | None | All | Required to fetch contacts |
| Companies | CRM/Sales Activities | None | All | None | All | Required to fetch and update opportunities. |
| Companies | Manage Attachments | All | None | None | All | Required to fetch member images and images in tickets and notes |
| Companies | Team Members | None | None | None | All | Required to fetch account managers |
Click Companies again to collapse the pane, then click Finance to open the next pane.
Module: Finance
| Module | Description | Add Level | Edit Level | Delete Level | Inquire Level | Comments |
|---|---|---|---|---|---|---|
| Finance | Agreements | None | None | None | All | Inquire allows TopLeft to set agreements when adding time entries. |
| Finance | Billing View Time | None | All | None | All | Required to create time entries |
Module: Project
| Module | Description | Add Level | Edit Level | Delete Level | Inquire Level | Comments |
|---|---|---|---|---|---|---|
| Project | Close Project Tickets | None | All | None | All | Required by the Close Ticket feature and to assign tickets to closed statuses. |
| Project | Project Headers | None | All | None | All | Edit allows TopLeft to change project statuses when a project card is moved between columns. |
| Project | Project Notes | All | None | None | All | Add and Inquire allow TopLeft to manage and show project notes. |
| Project | Project Phase | None | All | None | All | Inquire allows TopLeft to sync and display project phases. |
| Project | Project Scheduling | All | All | All | All | Inquire allows TopLeft to display resource assignments; Add/Edit/Delete allows TopLeft to modify resource assignments |
| Project | Project Teams | None | None | None | All | Inquire allows TopLeft to sync and display project team members. |
| Project | Project Ticket - Dependencies | All | All | All | All | Allow TopLeft to manage ticket dependencies |
| Project | Project Ticket Tasks | All | All | All | All | Allow TopLeft to add, edit, and delete project ticket tasks. |
| Project | Project Tickets | All | All | All | All | Manage project tickets. |
Module: Sales
| Module | Description | Add Level | Edit Level | Delete Level | Inquire Level | Comments |
|---|---|---|---|---|---|---|
| Sales | Closed Opportunity | None | All | None | All | |
| Sales | Opportunity | None | All | None | All | Edit allows TopLeft to change opportunity stages when an opportunity is moved between columns. |
Module: Service Desk
| Module | Description | Add Level | Edit Level | Delete Level | Inquire Level | Comments |
|---|---|---|---|---|---|---|
| Service Desk | Close Service Tickets | None | All | None | All | Required by the Close Ticket feature and to assign tickets to closed statuses. |
| Service Desk | Merge Tickets | All | None | None | All | Allows TopLeft to perform service ticket merges. |
| Service Desk | Resource Scheduling | All | All | All | All | Inquire allows TopLeft to display resource assignments; Add/Edit/Delete allows TopLeft to modify resource assignments |
| Service Desk | Service Ticket - Dependencies | All | All | All | All | Allows TopLeft to change ticket statuses when the ticket has a predecessor ticket for dependencies. |
| Service Desk | Service Tickets | All | All | All | All | Manage service tickets. |
Module: System
| Module | Description | Add Level | Edit Level | Delete Level | Inquire Level | Comments |
|---|---|---|---|---|---|---|
| System | API Reports | None | None | None | All | Allows TopLeft to fetch ConnectWise screens for registering embedded tabs. |
| System | Member Maintenance | None | None | None | All | Allows TopLeft to fetch members data. |
| System | My Company | None | None | None | All | Allows TopLeft to sync Territories, Structure Levels, etc. |
| System | Table Setup | All | None | None | All | Allows TopLeft to sync boards, statuses, locations, teams, etc, and register embedded tabs. |
Module: Time & Expense
| Module | Description | Add Level | Edit Level | Delete Level | Inquire Level | Comments |
|---|---|---|---|---|---|---|
| Time & Expense | Time Entry | All | All | None | All | Allows TopLeft to get, create and edit time entries and highlight stale tickets |
| Time & Expense | Time Entry Billable Option | All | None | None | All | Allows TopLeft to create time entries set as billable |
Click the save icon ![]() .
.
Add an API Member
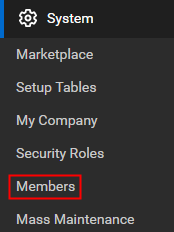
TopLeft authenticates itself to ConnectWise Manage as an API member. To open the Members section, click System → Members.
Click the API Members tab.

Click the "+" button in the toolbar.
![]()
Complete the member form as follows:
- Profile
- Member ID: TopLeft (or you can follow your existing pattern for member names).
- Member Name: TopLeft API
- Email: topleft@yourdomain.com
- System
- Role ID: TopLeft (or whatever you named the new security role)
- Level: Corporate (Level 1)
- Name: Corporate
- All other options- set to best reflect that this account has view of your entire organization, not just a single location or business unit.
From this page you can also restrict any service boards you don't want TopLeft to have access to. Please see the documentation to configure that here.
Save the member by clicking the disk icon ![]() .
.
Set Up API Credentials for the Member
After creating the member, you must set up API keys for it. Select the member you just created and navigate to the API Keys tab.
![]()
Click the "+" button in the toolbar.
![]()
In the description field, enter "TopLeft". Click the disk icon ![]() .
.
ConnectWise displays a public key and private key. Save both in a safe place. ConnectWise will never show the private key again.
Submit the API Credentials and Other Information in the Setup Portal
Go to https://customers.topleft.team/welcome/ and enter the requested information, including these API credentials.
That's it! Your application will be configured when you submit your information, and you'll get an email with instructions for logging in the first time.
Troubleshooting
ConnectWise sometimes doesn't immediately apply security role changes to API requests. If you have trouble setting up permissions, try these steps:
- Double-check the security role permissions against the list above. The permissions required by TopLeft can change as we introduce new features and as ConnectWise updates their schema.
After your TopLeft app has been set up, you can use a tool in the app to check permissions. It is available in Settings > ConnectWise API > Check Permissions.
- Change the role ID of the API member to a completely different security role, and save the member. Then swap it back to the TopLeft role and save.
- Delete the TopLeft security role, then create a new one from scratch as per the steps above. Then set the API member's role to the new role.
Further Reference
Refer to ConnectWise documentation:
![White logo TopLeft_240x78.png]](https://help.topleft.team/hs-fs/hubfs/White%20logo%20TopLeft_240x78.png?height=50&name=White%20logo%20TopLeft_240x78.png)