![White logo TopLeft_240x78.png]](https://help.topleft.team/hs-fs/hubfs/White%20logo%20TopLeft_240x78.png?height=50&name=White%20logo%20TopLeft_240x78.png)
Applies to: ConnectWise ticket boards
ConnectWise service and project cards share most fields, but there are a few differences.
Ticket Cards
The parts of a ticket card are:
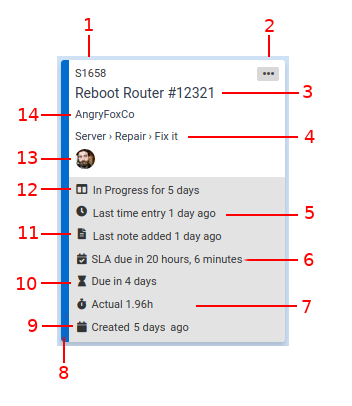
- Ticket ID, starting with "S" for service tickets and "P" for project tickets. You can easily copy the ticket ID to your clipboard by hovering over the number with your cursor, then clicking the
 icon that appears.
 - Card menu, with these functions:
- Send to Top: ranks the ticket at the highest priority in the column
- Send to Bottom: ranks the ticket at the lowest priority in the column
- Edit Ticket: view and change various properties of the ticket
- Tasks: edit the task checklist
- Manage Resources: opens a dialog to add or remove resources on the ticket. For project tickets, users being added must already be listed in the project's team.
- Dispatch: opens a dialog to create a schedule entry with a time and date for a resource.
- Enter Time/Note: opens a dialog to create a time entry or just a note without an associated time. Ticket statuses can be updated, and schedule entries can be marked done while creating a time entry/note.
- Change Priority: opens a dialog to select a new priority for the ticket
- Show Notes: opens a dialog to display a card's notes. This includes time entry notes.
- Close Ticket: closes the ticket after prompting for confirmation
- Open in ConnectWise: open the ticket in the ConnectWise web app. You can also click the ticket title to do this.
- Ticket summary. Click the summary to open the ticket in a new tab in the ConnectWise web application. Hold the Shift key and click the summary to open the ticket in the existing tab. When the ticket has an unread customer response then the summary is bold. Hover over the ticket summary to display the ticket description.
- Ticket Type, Subtype and Item. This is shown if the board's "Ticket type/subtype/item" option is enabled.
- Length of time since the last time entry was created for this ticket. This is shown if the column's "Time entries" option is enabled.
- Time remaining before the SLA for this ticket expires. This is shown if the column's "SLA time" option is enabled.
- Actual time (sum of time entries) and budget time from the ticket.
- Priority indicator. Hover your cursor over the ticket to show the priority name.
- Length of time since the ticket was created. This is shown if the board's "Ticket age" option is enabled.
- Due date of the ticket. This is shown if the board's "Due date" option is enabled.
- Length of time since the last note was created for this ticket. This is shown if the column's "Last note" option is enabled.
- Length of time since the ticket has changed statuses in TopLeft. This is shown if the column's "Status age" option is enabled.
- Assigned resources. When the assignment has a schedule entry for a specific date and time, the member's image has an outline and hovering over the image shows the schedule entry details.
For example: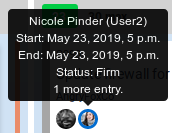
The outline color is blue for entries on future dates, green for entries on the current date, or red if it is in the past:
To show the full assignment details on the card (not in a tooltip), you can set the board's Assignment Type field to Details. - Company name
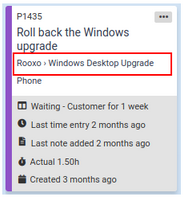
Project ticket cards are the same as service ticket cards except for the section highlighted in red, below. A project card will show its project name and phase name if the board's "Project name" and "Phase name" options are enabled, respectively.
Predecessor Tickets
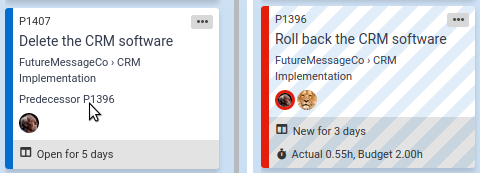
The card predecessor field is shown if the board's "Predecessor" option is enabled. If a card has a predecessor associated with it, you can hover over the field and the predecessor will be highlighted if it is present on the board.
Highlighting is supported for predecessor tickets, not predecessor phases.