![White logo TopLeft_240x78.png]](https://help.topleft.team/hs-fs/hubfs/White%20logo%20TopLeft_240x78.png?height=50&name=White%20logo%20TopLeft_240x78.png)
TopLeft needs access to your Autotask application to download tickets, projects, resources, and other records used to display your data. It also updates Autotask records when changes are made in TopLeft.
All communication between TopLeft and your Autotask instance uses the Autotask API and is encrypted by TLS.
To allow TopLeft access to your Autotask database, follow these instructions. These steps must be performed by an Autotask administrator with permission to manage security levels and resources.
Setup Checklist
These are the steps to configure your Autotask application for TopLeft:
- Add a security Level for TopLeft
- Add an API resource
- Set up API credentials for the resource
- Optional- enable impersonating resources of TopLeft
- Submit the API credentials and other information in the customer portal
Add a Security Level for TopLeft
To limit the information available to TopLeft, we recommend you set up a Security Level dedicated to the TopLeft user. To open the Security Levels administration section:
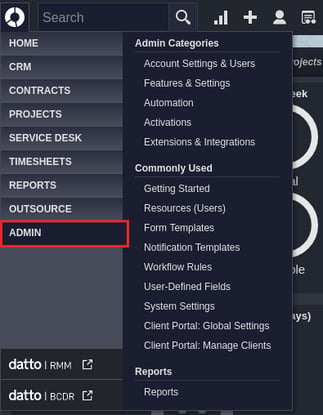
1. Open the ADMIN options from the drop-down menu in the top left.
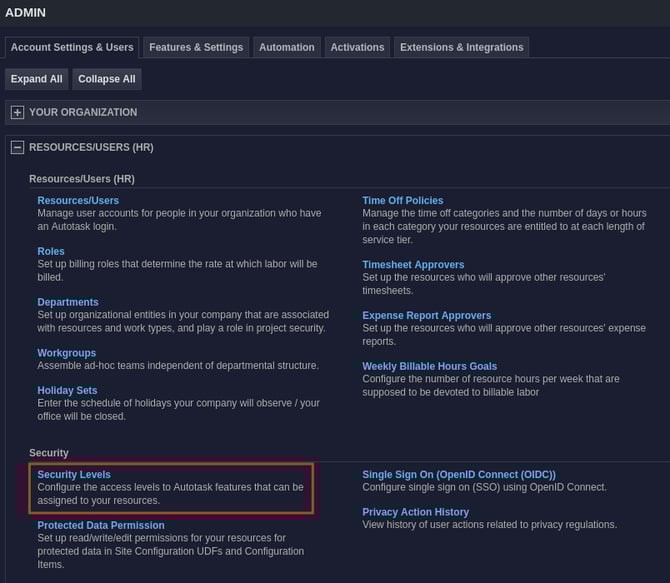
2. Under the Account Settings & Users tab, expand the Resources/Users (HR) section, then open the Security Levels option.
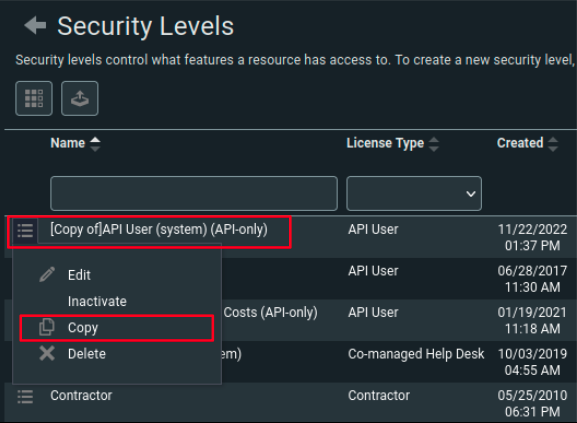
3. Click the triple bar icon on the API User (System) (API-only) Security Level, and click Copy Security Level.
4. Rename the copied Security Level "TopLeft", and click on the No Permission button for every single module.
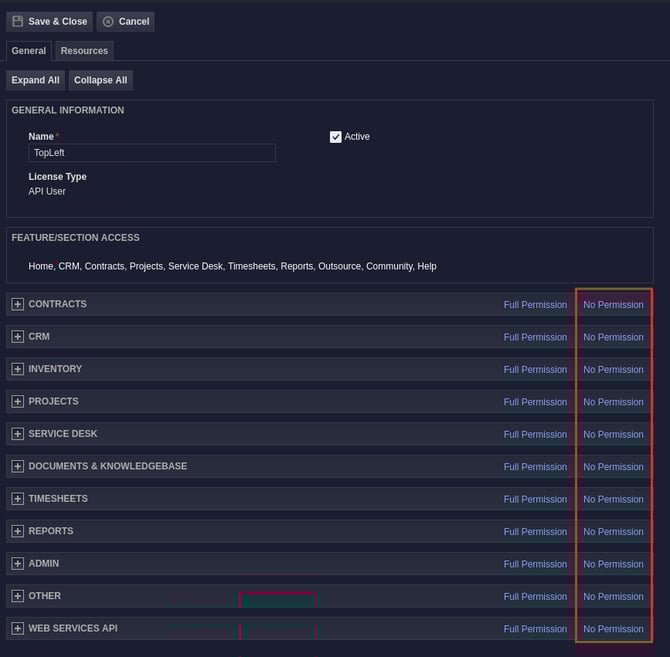
5. Set the module's security settings:
Module: Contracts
To open the Contracts module, click Contracts in the list.
| Module | Description | View | Add | Comments |
| Contracts | Contracts | All | No | Allows TopLeft to see all Contracts |
Open the "Contract Visibility" dropdown menu, and select "Full".
Module: CRM
| Module | Description | Permission | Comments |
| CRM | Customer & Cancellation | All | Allows TopLeft to see all Accounts of this type |
| CRM | Vendor & Partners | All | Allows TopLeft to see all Accounts of this type |
| CRM | Prospects, Leads, & Dead | All | Allows TopLeft to see all Accounts of this type |
| Module | Description | View | Add |
Edit |
Delete |
Comments |
|
CRM |
Opportunities & Quotes | All | No | No | No | Allows TopLeft to see Opportunities. This is necessary for updating projects with associated opportunities. |
Module: Projects
| Module | Description | View | Add | Comments |
| Projects | Client & Internal | All | No | Allows TopLeft to see all Projects of this type |
| Projects | Proposals | All | No | Allows TopLeft to see all Projects of this type |
You will also need to select the checkboxes listed below.
| Module | Enable these options | Comments |
| Projects | Can modify Contract on task and issue time entries | Allows TopLeft to modify Contract when creating time entries. |
| Projects | Can modify Work Type on task and issue time entries | Allows TopLeft to modify Work Type when creating time entries. |
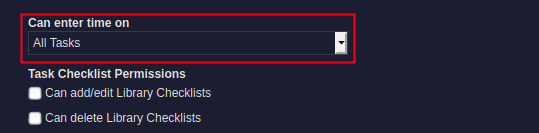
Open the "Can enter time on" menu, and select "All Tasks".
Module: Service Desk
| Module | Description | View | Add | Edit | Delete | Comments |
| Service Desk | Tickets | All | Yes | Yes | None | Allows TopLeft to view tickets, and change ticket statuses when a ticket is moved between columns. |
| Service Desk | Service Calls | All | Yes | Yes | All | Allows TopLeft to view, add, edit and delete service calls. |
You will also need to select the checkboxes listed below.
| Module | Enable these options | Comments |
| Service Desk > Time Entry Permissions | Can modify Contract on ticket time entries | Allows TopLeft to modify Contract when creating time entries. |
| Service Desk > Time Entry Permissions | Can modify Work Type on ticket time entries | Allows TopLeft to modify Work Type when creating time entries. |
| Service Desk > Time Entry |
Can modify Non-Billable setting on ticket time entries
|
Allow TopLeft to modify Show on Invoice checkbox when creating time entries. |
| Service Desk > Ticket Checklist Permissions | Can add/edit items | Allows TopLeft to modify Checklists on tickets |
| Service Desk > Ticket Checklist Permissions | Can delete/uncomplete items | Allows TopLeft to delete Checklist items and mark them as completed on tickets |
| Service Desk > Other Permissions | Can view non-billable time entries (Resources can see their own time entries) | Allows TopLeft to view non-billable time entries. |
Module: Admin
You need to select the checkboxes listed below:
| Module | Enable these options | Comments |
| Admin | Resources/Users (HR) | Allows TopLeft to sync Resources to view on cards. |
| Admin | Application-Wide (Shared) Features (Full Access) | Allows TopLeft to sync User-Defined Fields on objects that support UDFs. |
| Admin | Accounts & Contacts | Allows TopLeft to sync related information about Accounts, like type, or status. It also allows TopLeft to sync related information about Contacts to display contact information on cards. |
| Admin | Service Desk (Tickets) | Allows TopLeft to sync related information about Tickets, like ticket categories. |
| Admin | Projects & Tasks | Allows TopLeft to sync related information about Projects, and Tasks. |
Module: Other
You need to select the checkboxes listed below:
| Module | Enable these options | Comments |
| Other | Not required to change password | Check this or TopLeft will become unavailable when a password change is required. |
Module: Web Services API
You need to select the checkboxes listed below:
| Module | Enable these options | Comments |
| Web Services API | Can login to Web Services API | Allows TopLeft to access the Autotask Web Services API to sync your data. |
At the top of the window, click Save & Close to save the new Security level.
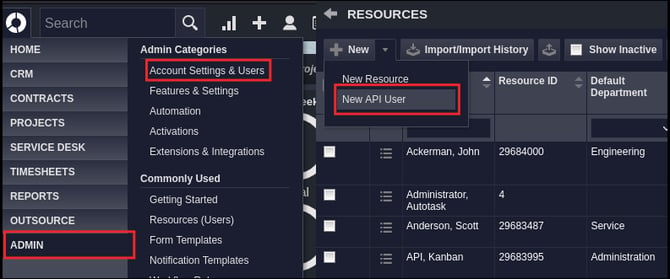
Add an API Resource
TopLeft authenticates itself to Autotask as an API resource. To open the Resources section, click Admin > Account Settings & Users Tab > Resources/Users then open the Resources/Users page and hover on the New button and select New API User.
Setup the API User with these settings:
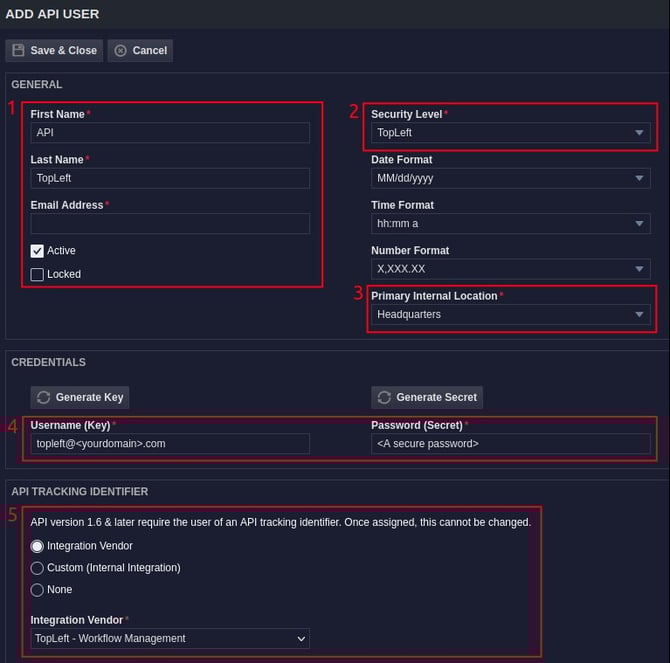
- Setup the First Name, Last Name and Email as desired. We suggest something TopLeft related to indicate this is the TopLeft API user.
- Set the Security Level to the "TopLeft" level you created earlier in this setup.
- Set the Primary Internal Location as desired. This field determines the timezone associated with the API user.
- Set the username to "topleft" with your Autotask domain at the end, and enter in a secure password. We suggest a random string of alphanumeric and special characters between 16-20 characters in length. Keep this password on hand temporarily so you can send it to us.
- In the "API Tracking Identifier" section, select "Integration Vendor" and set it to "TopLeft - Workflow Management".
The "Line of Business" section does not need to be modified.
At the top of the window, click Save & Close, to save the new API resource.
Optional- Enable Impersonating Resources of TopLeft
Certain changes made by users in TopLeft can be recorded in Autotask as being made by the Autotask user, not by the TopLeft API user.
If you wish to enable this functionality, follow the steps described here: Impersonate Autotask Resources from TopLeft
Submit the API Credentials and Other Information in the Setup Portal
Go to https://customers.topleft.team/welcome/ and enter the requested information, including these API credentials.
That's it! Your application will be configured when you submit your information, and you'll get an email with instructions for logging in the first time.
Troubleshooting
If you have trouble setting up permissions, try these steps:
- Double-check the security level permissions against the list above. The permissions required by TopLeft can change as we introduce new features and as Autotask updates their schema.
After your TopLeft app has been set up, you can use a tool in the app to check permissions. It is available in Settings > Autotask API > Check Permissions.
- Delete the TopLeft security level, then create a new one from scratch as per the steps above. Then set the API resource's level to the new level.
Further Reference
Refer to Autotask documentation: