![White logo TopLeft_240x78.png]](https://help.topleft.team/hs-fs/hubfs/White%20logo%20TopLeft_240x78.png?height=50&name=White%20logo%20TopLeft_240x78.png)
Applies to: ConnectWise ticket boards
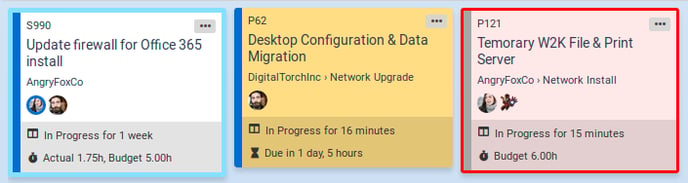
The appearance of cards can be customized based on the data on your tickets. This allows you to bring attention to certain types of tickets or tickets with certain types of problems. Here are some examples:
- A column includes tickets in both the Customer Responded and In Progress statuses, but Customer Responded tickets have a blue background
- Tickets in the Escalate status get an orange border
- Tickets in the In Progress column, but without anyone assigned, get a red background
- Tickets in the Ready column, but without a budget set, get an orange border
Style Customization Demonstration
Rather watch than read about how to set up profiles? Then watch this:
How to Customize the Appearance of Cards
Card appearance is customized using Style Profiles. Here's how it works:
- Style Profiles are a list of Rules. Tickets are compared to each rule in the list, and if the rule matches then the card's appearance is updated. Later rules can overwrite the style set by earlier rules.
- A Style Rule has a set of conditions and a set of styles. When a ticket matches all the specified conditions, the styles are applied.
- Columns reference a single Style Profile. This lets you to set up a board with different styles applied to different columns.
Style Profiles
Card customizations are applied to cards by Style Profiles. Profiles have rules that format the cards based on conditions you set, called Style Rules. Access the profiles page by clicking the "Profiles" link located next to the "Boards" dropdown on the main menu. From here you can view and edit the current Style Profiles or create a new one.
Initially there is only the default profile. The default profile cannot be edited, and has one rule that highlights cards titles in bold if a customer has replied to a ticket.
Open a profile by clicking its name or the ![]() button , and delete them by clicking the
button , and delete them by clicking the ![]() button.
button.
To create a new profile click the  button, which will take you to the create profile screen.
Rules appear in a list on the profile page and can be dragged to organize their evaluation order.
The first rule in any profile defines the default appearance of the cards. Its style options are always applied. If you drag a different rule into the first position, that rule will become the default rule.
The list of rules is evaluated sequentially. If a ticket matches multiple rules that modify the same style property, the style of the lowest matching rule in the list is applied. This allows you to layer your rules to create adaptable rulesets for many different scenarios.
To commit your changes, click the ![]() button.
button.
Style Rules
On the rule list page, click the  button to create a new rule. If it is the first rule, the condition fields will be disabled. This is because the first rule sets the default card appearance and its conditions are ignored. To keep the default appearance of the cards the same as the provided default profile, i.e. white backgrounds and normal font, just save the rule as-is. You don't need to set the styles of the default rule.
Components of a Rule
For the full list of conditions and styles, see Conditions and Styles for Card Appearance Customization.
Rules have two elements: Conditions and Styling.
Conditions are the properties that determine if a ticket matches the rule. Conditions are ANDed together, i.e. If a rule has the "No Resource Assigned" checked and "Status Match" set to "In Progress", it will only trigger on cards "In Progress" with no resource assigned to them. To get "OR" functionality, you can create multiple rules.
Styling defines the customized appearance applied to the card when the conditions of a rule are met.
Columns
Profiles are assigned to columns on the board edit page. To assign a profile to a column, go to the Columns tab on the board edit page. Select a profile from the labelled dropdown menu on your columns, and save the board.