![White logo TopLeft_240x78.png]](https://help.topleft.team/hs-fs/hubfs/White%20logo%20TopLeft_240x78.png?height=50&name=White%20logo%20TopLeft_240x78.png)
Applies to Engineer and Manager plans
Learn more about editing records.
There are two ways to edit a ticket in TopLeft:
- From a Kanban board by one of these methods: clicking the ticket, clicking a button on the bottom of a card, using the "..." menu options, or using a keyboard shortcut (read more)
- From a Gantt chart (for Manager-licensed users only)
To edit a ticket in ConnectWise, click the "CW" button on the bottom of the card, or at the top of the editing dialog click the "View in ConnectWise" button.
Edit Ticket
The following fields can be edited:
- Summary
- Due date
- Budget hours
- Company
- Contact
- ConnectWise Board
- Status. You can also change status by dragging between columns.
- Priority
- Type
- Subtype
- Item
- Owner
- Agreement
- Project
- Phase
- Initial description
Tasks
Add, remove, and edit task checklist items. You can mark items as complete or incomplete, and assign them to members.
Merge Ticket
Merge the information in this ticket into another ticket. This ticket will be closed.
- Parent ticket ID: enter the ID of the ticket that will be the parent ticket.
- Merged ticket status: choose the status of this ticket after it's merged. This allows you to select from among multiple closed statuses.
Time & Notes
The time entry dialog also shows existing notes on the ticket. If there are many notes, navigate to earlier notes by using the paging function at the bottom of the dialog.
The time entry dialog is similar to the time entry form in ConnectWise. Complete the form as follows:
- Date: The date of the time entry. This defaults to today.
- Overnight: Check this if the entry represents work done over midnight. This splits the work into two time entries on two days.
- Enter time record: Check this to enter time. Clear this to create a note without entering time.
- Mark as done: Mark your assignments to this ticket as done.
- Ticket status: Change the ticket status in addition to entering time.
- Work role: Set the work role.
- Agreement: Set the agreement.
- Start time: The start time of the entry. This is optional if you enter an Actual time value. Start time can be entered in a variety of formats, such as 2pm, 2:00 pm, or 14:00.
- End time: The end time of the entry. The format is the same as Start time. If Start time and Actual hours are entered, no End time can be entered.
- Hours deduct: Subtract this amount of time from what would otherwise be calculated from the other fields.
- Actual hours: The actual amount of time in hours. If Start time and End time are entered, no Actual time can be entered.
- Work type: Set the work type.
- Billable: Select whether to bill or not bill this entry to the ticket's company.
- Notes: A description of the time entry, or the contents of the note if no time entry is made. Depending on the selected options, this is also recorded in the Discussion/Internal/Resolution logs, and for time entries it can be sent to the ticket Contact, Resources, and CC records.
- Add notes to Discussion/Internal/Resolution: Check the records that the note should be applied to in ConnectWise.
- Contact/Resource/Cc: Select which people receive a copy of the note by email. The contact option is available when a contact with an email address is associated with the ticket. When notes are created, contact emails are sent from TopLeft instead of ConnectWise due to limitations in the ConnectWise API. Custom email templates can be used, or default templates provided by TopLeft will be used for contact emails. Changes to the CC field are saved in the ticket. Separate email addresses with a semicolon.
Dispatch
Assign new members to a ticket or remove existing members from a ticket. For project tickets, to assign a new member the person must already be part of the project team.
The members available to assign to a ticket are those members of the team associated with the Kanban board. If a board is not associated with a team, then all licensed users are available to assign to a ticket.
When you assign new members, TopLeft can send them a message by email to let them know they have been assigned. Enable the "Notify members being assigned" option and supply an optional message with details, then click Save.
On a resource swimlane board, you can re-assign tickets by dragging the ticket between swimlanes.
Assignments
You can assign new members to a ticket by clicking their name in the Available list. This moves them to the Selected list. Click Assign.
Dispatch
Assign a member with an appointment at a specified time.
Complete the form as follows:
- Member: The member you want to assign the schedule entry to.
- Ticket status: Select a status if you want to also change the tickets status while dispatching. Selecting nothing will leave the status unchanged. This selection is remembered for tickets in the same column that share a ticket board, saving time if you are applying the same status multiple times in a row.
- Date: The date of the schedule entry. This defaults to today.
- Start time: The start time of the schedule entry. Start time can be entered in a variety of formats, including: 2pm, 2:00 pm, or 14:00.
- Duration: The duration of the schedule entry in hours, represented as a decimal.
When you select the member and date, TopLeft shows entries from the member's ConnectWise calendar on that date. This can help you pick a time and duration that is available for that ticket.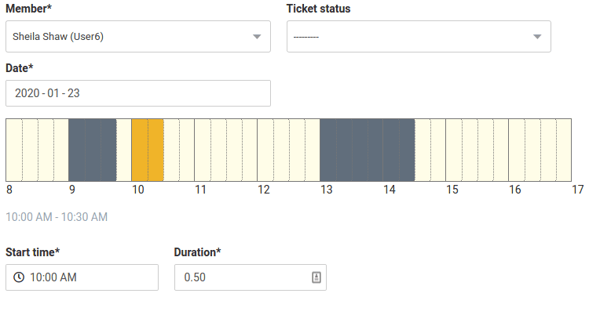
You can click on the day line to select the start time and duration in 15-minute increments. First, click on a box to select the start or end time. Second, click on another box to set the duration of the schedule entry. To clear the selection, click on any box.
When you dispatch a ticket, TopLeft can send the member a message by email to let them know they have been assigned. Enable the "Notify member" option and supply an optional message with details, then click Save.
Files
Change Priority
To change the priority of a ticket, you can click the colored bar on the left side of the card. This opens a dialog to select the new priority with a single click.